
If you’ve never made chilaquiles rojos at home, now’s the time. This irresistible Mexican breakfast delivers the perfect balance of comfort and bold, authentic flavors. At its core, it’s a clever and delicious way to transform leftover corn tortillas into something warm, crispy, and coated in a vibrant, spicy red salsa.
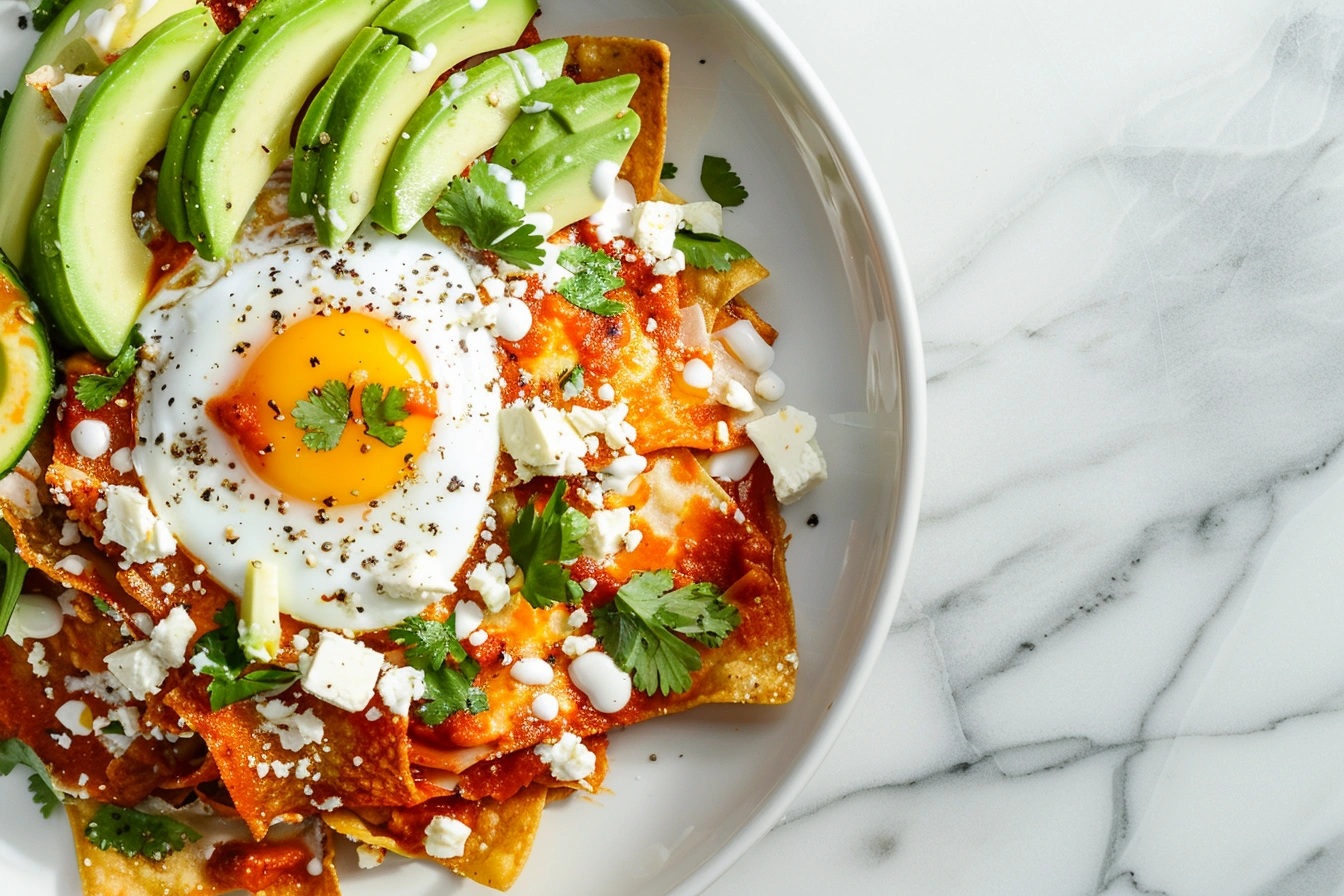
Crispy tortilla chips are quickly simmered in a rich salsa roja, then topped with ingredients like fried eggs, queso fresco, and Mexican crema. Every bite brings a perfect mix of textures: soft and saucy on the bottom, lightly crisp on the top, with cool and creamy toppings for contrast.
Red chilaquiles are quick to make, endlessly customizable, and deeply rooted in traditional Mexican cuisine. Whether you serve them for brunch, lunch, or even dinner, this dish is the kind of feel-good food that’s easy to love and hard to forget.
What makes this chilaquiles recipe truly special is its effortless simplicity. No complicated equipment or exotic ingredients required – just everyday pantry staples that create extraordinary results. Just fresh corn tortillas, ripe tomatoes, dried chiles, and a few basic pantry staples. The key is learning how to cook each component properly – from achieving perfectly crispy chips to creating a smooth, flavorful red sauce that coats every piece without making them soggy.
Uncover the Rich Heritage Behind This Legendary Mexican Dish
Chilaquiles have deep roots in Mexican culinary tradition, dating back to pre-Hispanic times when indigenous peoples first began cooking with corn tortillas. The word “chilaquiles” has fascinating origins in the ancient Nahuatl language – “chīlāquilitl” – which beautifully captures the essence of “chiles and greens.”
Originally, this dish was born from necessity – a way to use stale tortillas rather than waste them. Mexican cooks would fry day-old tortillas until crispy, then simmer them in salsa to soften them just enough to eat. This practical approach to cooking reflects the resourcefulness that defines much of Mexican cuisine.
The red salsa version became particularly popular in central Mexico, where tomatoes grow abundantly. Different regions developed their own variations, and today chilaquiles rojos remain a breakfast staple throughout Mexico and have gained popularity worldwide.
7 Incredible Benefits That Make This Recipe Absolutely Perfect
This chilaquiles rojos recipe offers numerous advantages that make it perfect for home cooks of all skill levels.
- Quick and Easy: Ready in under 30 minutes, perfect for a satisfying breakfast or brunch.
- The sauce: Can be prepared ahead of time, making assembly even faster.
- Budget-Friendly: Uses simple pantry ingredients like tomatoes, garlic, and corn tortillas. Most ingredients are affordable and readily available at any grocery store.
- Nutritious and Satisfying: Naturally gluten-free and vegetarian (with optional meat toppings). Corn tortillas provide complex carbohydrates, tomatoes offer vitamins, and toppings add protein and healthy fats.
- Waste Reduction: Great way to use up stale tortillas or leftover salsa. This recipe embodies sustainable cooking practices that have long been part of Mexican cuisine.
- Customizable: You can easily adjust the spice level by choosing different chiles or removing seeds. This flexibility makes the dish suitable for everyone.
- Versatile: Transforms any meal into something special – whether it’s an energizing breakfast, leisurely brunch, satisfying lunch, or comforting dinner.
Essential Ingredients for Restaurant-Quality Chilaquiles at Home
Premium Red Sauce (Salsa Roja) Ingredients
| Ingredient | Quantity |
|---|---|
| Roma tomatoes | 4 medium, chopped |
| Dried chiles de árbol | 2 to 3 (or guajillo for milder taste) |
| White onion | 1 small, chopped |
| Garlic cloves | 2, peeled |
| Water | ½ cup (plus more for boiling) |
| Salt | ½ teaspoon (or to taste) |
| Vegetable oil | 1 tablespoon |
Perfect Tortilla Chips – Crispy Every Time
| Ingredient | Quantity |
|---|---|
| Corn tortillas (day-old) | 8 small |
| Oil for frying | As needed (about 1 cup) |
| Salt | Pinch |
Note: Store-bought tortilla chips can be used as a shortcut — choose thick, unsalted chips for best results.
Irresistible Toppings That Transform Your Dish
| Topping | Quantity (suggested) |
|---|---|
| Fried eggs or scrambled eggs | 1 per serving |
| Queso fresco or cotija | ½ cup, crumbled |
| Mexican crema or sour cream | 2 tablespoons |
| Ripe avocado | 1, sliced |
| Fresh cilantro | Handful, chopped |
| Thinly sliced onion | To taste |
| Refried beans (on the side) | As desired |
| Shredded chicken (optional) | 1 cup, cooked |
Step-by-Step Success: Foolproof Instructions for Perfect Results
Master the Ultimate Crispy Tortilla Chips
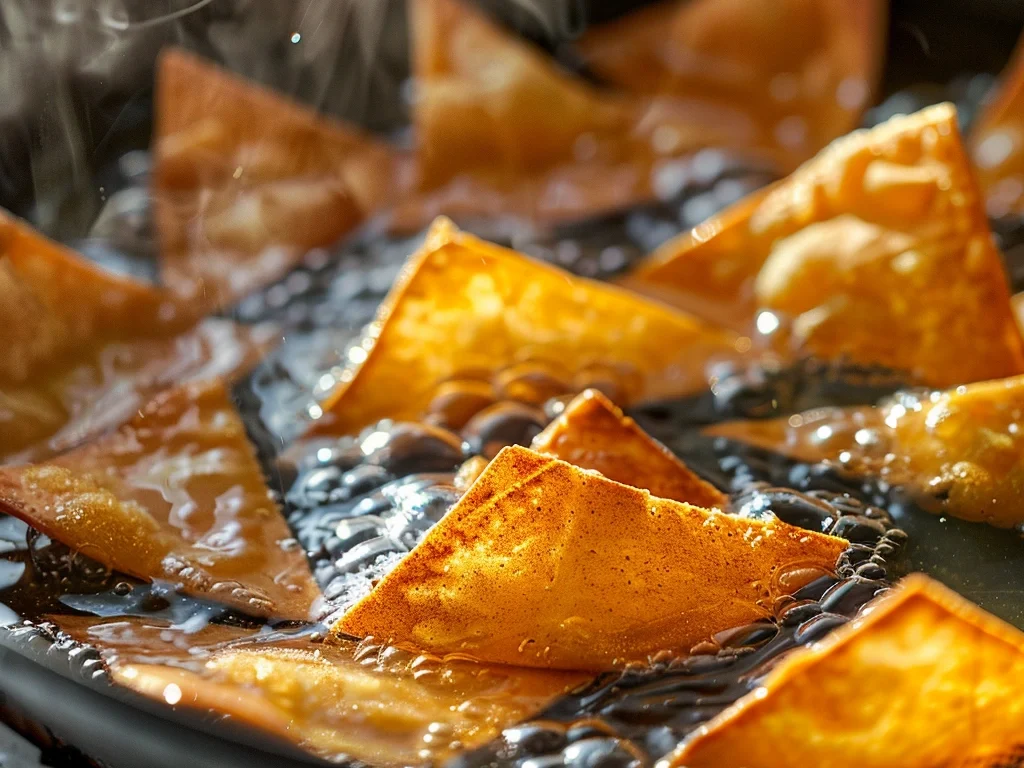
Everything begins with achieving flawlessly crispy tortilla chips – this is where your chilaquiles success story truly starts. If using fresh or day-old corn tortillas:
- Shape your success – create uniform triangles or strips using a sharp knife to ensure even cooking and stunning presentation. Uniform pieces cook more evenly and look more professional.
- Create your oil bath: Heat 1 cup of oil in a large skillet over medium-high heat until it reaches the perfect 350°F sweet spot. Test for readiness with this foolproof trick: drop in a tortilla piece – it should sizzle and dance immediately!
- Work in batches for perfection – avoid overcrowding to ensure each piece gets gloriously golden and crispy in just 2 minutes. The chips should sound crisp when tapped with a spoon.
- Rescue and drain – lift out your golden treasures with a slotted spoon and let them rest on paper towels to achieve . Lightly salt while still warm so the seasoning adheres properly.
- Repeat until all tortillas are fried, maintaining oil temperature between batches. Set aside until ready to use.
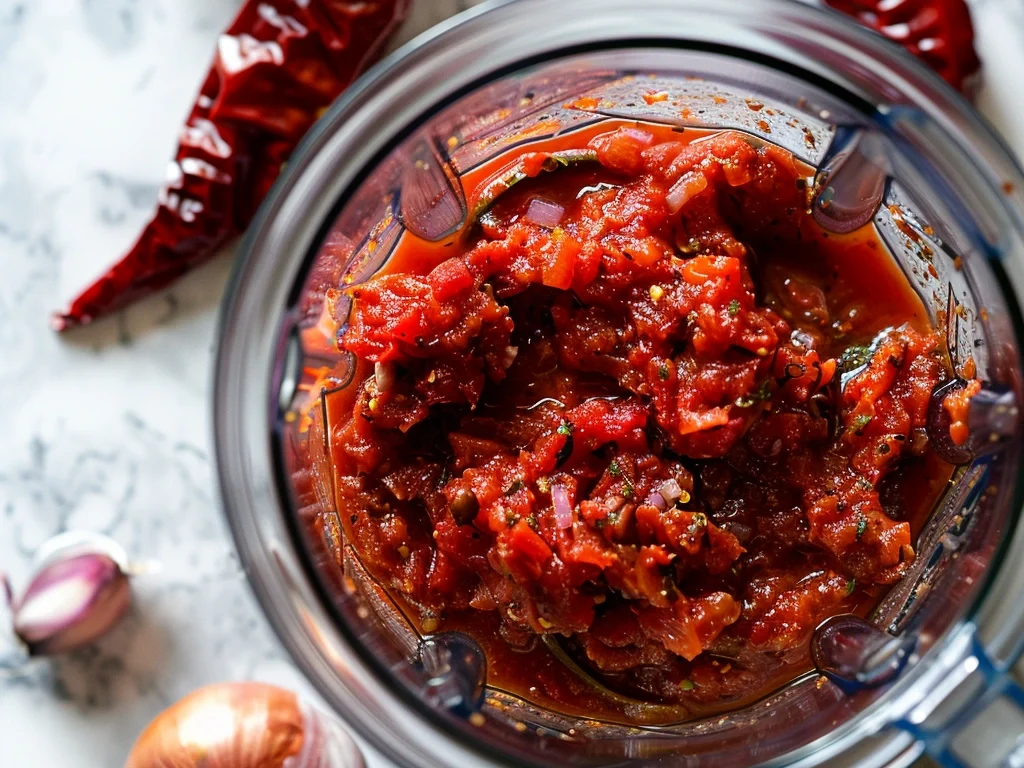
Create the Perfect Red Salsa That Never Disappoints
Creating the perfect red sauce is crucial for authentic chilaquiles rojos:
- In a medium saucepan, combine the chopped tomatoes, dried chiles, chopped onion, and peeled garlic cloves. Cover completely with water and bring to a rolling boil.
- Cook for 8–10 minutes until the tomatoes are completely soft and the chiles are pliable. The chiles should be easy to tear when pressed with a spoon.
- Drain the ingredients, reserving about ½ cup of the flavorful cooking water. This liquid contains concentrated flavors that will enhance your preparation.
- Transfer all ingredients to a blender. Add the reserved cooking water and salt, then blend until completely smooth. Achieve that stunning crimson hue – this rich, deep color signals your sauce is ready to deliver amazing flavor.
- Prepare your finishing stage – add 1 tablespoon of oil to a clean skillet and heat over medium temperature. Pour in the blended salsa carefully, as it may splatter initially.
- Cook it for 6–8 minutes, stirring frequently, until it thickens slightly and darkens in color. You’ll know it’s ready when the sauce gently covers the back of a spoon while remaining fluid and smooth. Remove from heat.
Expert Assembly Techniques for Restaurant-Quality Presentation
This step requires timing and gentle handling to achieve the perfect texture:
- Reheat the red salsa over medium-low heat if it has cooled. It should be hot but not boiling when you add the chips.
- Add the fried tortilla chips directly into the pan with the warm dip. Embrace with care – use a large spoon to gently fold the chips into the sauce with loving, protective movements.
- Cook for 1–2 minutes, stirring very gently to coat all chips without breaking them. The goal is to soften the chips slightly while maintaining some crispiness.
- Remove from heat as soon as chips are evenly coated and slightly softened.
Pro Garnishing Secrets for Show-Stopping Results
- Divide the sauced chips onto warmed plates immediately. Working quickly prevents the chips from becoming too soft.
- Top each serving with your choice of garnishes: fried eggs, sliced avocado, crumbled cheese, Mexican crema or sour cream, chopped onions, and fresh cilantro.
- Serve immediately while the chips still have some texture contrast.
Game-Changing Tips & Creative Variations
Essential Tips for Success
Perfect Chip Texture: Use stale tortillas for the best results. Day-old corn tortillas have less moisture, which means they’ll fry up crispier and hold their texture better when mixed with sauce.
Oil Temperature Control: Fry chips in properly heated oil. The chips should sizzle immediately when added. Too low temperature = disaster! Your chips will soak up oil like sponges, leaving you with soggy, greasy results instead of the golden perfection you’re after.
Gentle Mixing: Do not overmix chips with the dip. Here’s the secret: gently fold to coat every chip without crushing your beautifully crispy creations. Think tender embracing, not aggressive stirring!
Make-Ahead Strategy: The salsa can be prepared up to 3 days in advance and stored in the refrigerator. Here’s the magic: the flavors deepen and intensify as they blend together, creating an even richer, more complex taste experience.
Heat Level Control: Customize your fire level by choosing different chiles and adjusting quantities. You’re in complete control of the spice adventure! Chiles de árbol provide significant heat, while guajillo chiles offer mild warmth with sweet, earthy notes.
Creative Variations
Protein Additions: Transform your chilaquiles into a heartier meal by adding cooked proteins. Shredded chicken works beautifully – simply fold it in with the chips during the final cooking stage.
Egg Variations: While fried eggs are traditional, scrambled eggs mixed directly into the chilaquiles create a different texture and make the dish more substantial.
Healthier Options: For a lighter version, try baking the tortilla chips instead of frying. Cut tortillas into pieces, brush lightly with oil, and bake at 400°F until crispy.
Green Version: Make chilaquiles verdes by substituting the red sauce with a tomatillo-based green salsa. The cooking method remains the same, but the flavor becomes brighter and more tangy.
Brilliant Serving Ideas That Always Impress
Classic Breakfast Combinations
The traditional way to serve red chilaquiles creates a balanced, satisfying meal. Start with a generous portion of the sauced chips, then top with a fried egg cooked sunny-side up. The runny yolk creates an additional dip that enriches each bite.
Add sliced avocado for healthy fats and creamy texture contrast. The cool, buttery avocado balances the warm, spicy chips perfectly. Crumbled queso fresco or cotija cheese provides salty, tangy notes that complement the tomato-based sauce.
Brunch Enhancement
For special occasions or weekend brunches, elevate your red chilaquiles with additional sides. Serve refried beans alongside the main dish – their creamy texture and earthy flavor pair wonderfully with the crispy, saucy chips.
Consider offering fresh fruit like melon or oranges to cleanse the palate. Mexican coffee makes an excellent beverage choice, its bold flavor standing up to the spicy chilaquiles.
Pair With
- Green salad with lime vinaigrette
- Fresh fruit or fruit salad
- Mexican coffee or agua fresca
- Fresh orange juice or hot chocolate
Timing is everything! Serve immediately to capture that magical contrast of tender-crispy textures that makes chilaquiles absolutely irresistible.
Smart Storage Tips & Surprising Nutritional Benefits
Storage Tips
Red chilaquiles are best enjoyed immediately, but leftovers can be stored in the refrigerator for up to 2 days. Store the sauce separately when possible to maintain better texture. The red sauce keeps well for up to 5 days refrigerated and actually improves in flavor.
To reheat, use a skillet over medium-low heat rather than the microwave. Add a small amount of fresh “salsa” if the mixture seems dry.
Nutritional Benefits
A serving of red chilaquiles provides balanced nutrition. The corn tortillas offer complex carbohydrates and fiber, while tomatoes contribute vitamins A and C plus lycopene. When topped with eggs, the dish becomes a complete protein source. Avocado adds heart-healthy fats, making this a nutritious and satisfying meal.
Your Chilaquiles Success Story Starts Here
This chilaquiles rojos recipe represents everything a great meal should be — simple, vibrant, and deeply satisfying. With just a few humble ingredients, it delivers bold flavors and comforting textures that bring people together around the table.
The beauty of red chilaquiles lies in their flexibility and forgiving nature. Once you master the basic technique of frying chips and making sauce, you can customize the dish endlessly to suit your preferences. Whether you’re cooking for family breakfast or hosting weekend brunch, this recipe delivers authentic Mexican flavors that satisfy on every level.
Remember that great red chilaquiles come from understanding each component and how they work together. Take time to properly fry your chips, develop flavor in your dip, and choose quality toppings. Most importantly, don’t be afraid to make this recipe your own and cook with confidence.
Quick Answers to Common Chilaquiles Questions
Q: Can I use store-bought tortilla chips?
Yes, store-bought chips work as a convenient shortcut. Choose thick, high-quality, unsalted tortilla chips for best results. Thin chips become soggy too quickly when mixed with sauce.
Q: Are chilaquiles rojos spicy?
The heat level depends on your chile choice. Chiles de árbol create a moderately spicy dish, while guajillo chiles provide mild warmth. Remove seeds to reduce heat, or add more chiles for extra fire.
Q: Can I make the salsa ahead of time?
Smart prep tip: Make your red salsa up to 3 days ahead and refrigerate it – the flavors actually get better with time! Many cooks prefer making it ahead because the flavors develop and improve over time.
Q: What’s the difference between chilaquiles rojos and chilaquiles verdes?
Rojos use red tomato-chile sauce that’s deeper and earthier in flavor. Verdes use green tomatillo salsa that’s brighter and more tangy. Both follow similar preparation methods.
Q: How do I keep chilaquiles from getting soggy?
Fry tortillas until completely golden and crispy, use hot sauce when combining, mix gently without over-stirring, and serve immediately. Don’t let the assembled dish sit too long before eating.
Q: What other proteins work well with chilaquiles rojos?
Beyond eggs, try chicken, chorizo, or carnitas. Cook proteins separately and fold them in during final assembly. Vegetarians might enjoy black beans as a protein alternative.